Our target of the day, seemingly heavily inspired from star battle, will be LinkedIn’s Queens game. Our goal is to find a way to solve any grid of the game leveraging CodeQL.
Introduction
CodeQL
CodeQL usually loosely refers to a set of components: an engine, a query language, libraries, etc.
From a high level, it operates by hooking into the compilation steps building a program to gather facts about its source code that are consolidated into a database. One can then write queries in “QL”1, to extract information out of this database. Usually, information about where vulnerabilities are lurking in one’s code.
The syntax of QL is similar to SQL, but the semantics of QL are based on Datalog, a declarative logic programming language often used as a query language. This makes QL primarily a logic language, and all operations in QL are logical operations. 2
So, CodeQL inherits from Datalog, a logic programming language.
Logic Programming
For those bred to imperative programming languages, that are used to write programs expressing how to solve a particular problem, logic programming is a bit of a surprising beast that is confusing to tame.
With logic programming,
you specify what you want to achieve rather than how to achieve it. In other words, you define the rules and constraints that govern the data, and the system automatically derives the answers to your queries. 3
Now we have our secret recipe: instead of trying to compute the solution ourselves, we “just need” to express facts and constraints about the game we will be trying to solve, and let CodeQL deduce the solution for us.
Queens
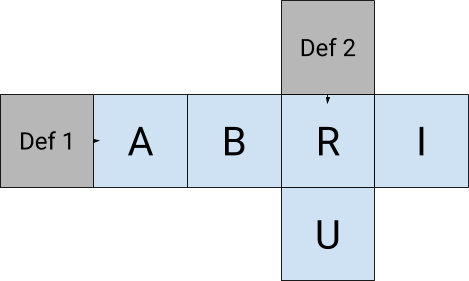
Queens is a puzzle game where the goal is to place a set of “queens” on a small chess-like board with colored cells, respecting the following rules:
- Each row, column, and colored region must contain exactly one queen.
- Queens cannot be placed in adjacent cells, including diagonally.
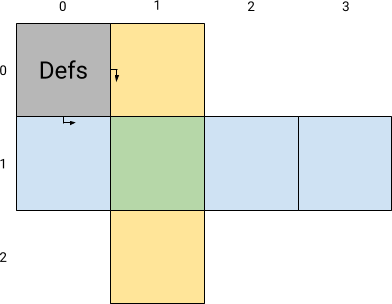
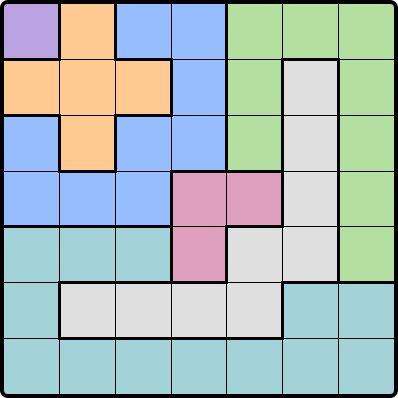
Here is an example of an empty grid:
On paper
So, how can we “encode” the game of Queens as facts and constraints that we will have CodeQL reason about?
- Encoding the game setup:
- The board’s cells can be uniquely represented by their cartesian coordinates on the grid;
- The board is partitioned into zones of different colors, which gives that each zone can be represented as a set of coordinates;
- All queens end on cells, therefore the endgame solution can also be also represented as a set of coordinates.
- Encoding the game rules:
- As per rule 1., any pair of queens cannot on the same row, column, nor zone;
- As per rule 2., any pair of queens cannot be adjacent, including diagonally.
… and that’s it.
We can know reformulate what we want to do:
- After encoding the different zones, we will let CodeQL find a set of values for coordinates of cells to put queens on (i.e. 1.3.) respecting the rules (i.e. 2.);
- If CodeQL finds values that fit our constraints, we place our queens on the represented cells and call it a day.
Implementation
Top level query
At a high level: we want to be given the set of cells to places our queens on. These cells must respect the predicates representing the constraints 2.1. and 2.2. we deduced from the rules.
Here is the query we get:
from
  Cell queen_1, Cell queen_2, Cell queen_3, Cell queen_4, Cell queen_5, Cell queen_6, Cell queen_7,
where (
  allDifferentRowsColumnsAndNotAdjacent(
    queen_1, queen_2, queen_3, queen_4, queen_5, queen_6, queen_7
  )
  and
  inEachZone(queen_1, queen_2, queen_3, queen_4, queen_5, queen_6, queen_7)
)
select queen_1, queen_2, queen_3, queen_4, queen_5, queen_6, queen_7
Let’s implement the elements that we are missing for this query to work: a Cell class, and the two predicates allDifferentRowsColumnsAndNotAdjacent, and inEachZone.
Cell representation
As we discussed earlier, we see a Cell as a pair of Coordinate representing respectively the row and column we can find the cell at. The grid we are solving is \(7*7\) cells big, so coordinates are between 0 and 6.
We use QL classes to implement these representations.
class Coordinate extends int {
  Coordinate() {
    this in [0..6]
  }
}

class Cell extends string {
  Coordinate x;
  Coordinate y;

  Cell() { this = x.toString() + y.toString() }
}
Rules predicate
We use predicates to encode the rules of the game.
All queens are on different rows, columns, and not adjacent
Constraint 2.1. states that any two pair of queens can’t be on the same row, same column, nor be adjacent to each other.
Therefore, we can restrict all the cells we should be given, saying that for any pair of different cells a and b among them, a and b must not be on the same row, same column, nor be adjacent.
predicate allDifferentRowsColumnsAndNotAdjacent(Cell c1, Cell c2, Cell c3, Cell c4, Cell c5, Cell c6, Cell c7) {
  forall(
    Cell a, Cell b
    | a in [ c1, c2, c3, c4, c5, c6, c7 ] and
      b in [ c1, c2, c3, c4, c5, c6, c7 ] and
      a != b
    | not a.sameRow(b) and
      not a.sameColumn(b) and
      not a.adjacent(b)
  )
}
We see that we need to enrich our Cell class with the member predicates sameRow, sameColumn, and adjacent:
class Cell extends string {
  // ...

  Coordinate getX() { result = x }
  Coordinate getY() { result = y }

  predicate sameRow(Cell c) {
    x = c.getX()
  }

  predicate sameColumn(Cell c) {
    y = c.getY()
  }

  predicate adjacent(Cell c) {
    exists(
        int i, int j
        | i in [-1..1] and j in [-1..1]
        | x + i = c.getX() and y + j = c.getY()
    )
  }
}
One queen per colored zone
As mentioned earlier, we need to encode the specific color zones of the board we are trying to solve.
This happens through the QlBuiltins::InternSets parameterized module, that has a Set class exposing a contains predicate that tells if a given element belongs to a selected set.
Cell getAValue(string zone) {
  zone = "purple" and result = ["00",]
  or
  zone = "orange" and result = ["01", "10", "11", "12", "21",]
  or
  zone = "blue" and result = ["02", "03", "13", "20", "22", "23", "30", "31", "32",]
  or
  zone = "green" and result = ["04", "05", "06", "14", "16", "24", "26", "36", "46",]
  or
  zone = "pink" and result = ["33", "34", "43",]
  or
  zone = "grey" and result = ["15", "25", "35", "44", "45", "51", "52", "53", "54",]
  or
  zone = "cay" and result = ["40", "41", "42", "50", "55", "56", "60", "61", "62", "63", "64", "65", "66",]
}

module Z = QlBuiltins::InternSets<string, Cell, getAValue/1>;

predicate inEachZone(Cell c1, Cell c2, Cell c3, Cell c4, Cell c5, Cell c6, Cell c7) {
  Z::getSet("purple").contains(c1) and
  Z::getSet("orange").contains(c2) and
  Z::getSet("blue").contains(c3) and
  Z::getSet("green").contains(c4) and
  Z::getSet("pink").contains(c5) and
  Z::getSet("grey").contains(c6) and
  Z::getSet("cay").contains(c7)
}
And with that, we have completed the query we need to solve the example instance of the game we want to crack.
A word on inefficiency
I was tempted at first to break down the logic of allDifferentRowsColumnsAndNotAdjacent into three separate predicates that follow the same structure and logic, except they apply the constraints “one by one”.
predicate allDifferentRows(Cell c1, ... , Cell c7) { ... }
predicate allDifferentColumns(Cell c1, ...,  Cell c7) { ... }
predicate allNotAdjacent(Cell c1, ... , Cell c7) { ... }
Doing so lead to queries that were being solved extremely slowly by the engine (I cut the process short after 60+ minutes without a result).
Inspired by this behaviour, I also thought that I should inversely get rid of the inEachZone predicate, to move its inner logic into the other predicate.
predicate allDifferentRowsColumnsZonesAndNotAdjacent(Cell c1, Cell c2, Cell c3, Cell c4, Cell c5, Cell c6, Cell c7) {
  forall(
    Cell a, Cell b
    | a in [ c1, c2, c3, c4, c5, c6, c7 ] and
      b in [ c1, c2, c3, c4, c5, c6, c7 ] and
      a != b
    | not a.sameRow(b) and
      not a.sameColumn(b) and
      not a.adjacent(b) and
      not a.sameZone(b)
  )
}
But that also led to an explosion of the query run time.
The CodeQL documentation4 mentions a couple of usual suspects when having performance issues. After investigating, and trying to tweak my solution, I still failed to fully make sense of what I experienced.
The code I shared yields a correct solution, and is fast (enough), as we will see. But I am not able to explain why it does so, and why the trials presented in this section don’t, without a lot of hand waving. Diving further into the troubleshooting of CodeQL query performance appeared to be yet another rabbit hole, and will therefore either be left as an exercise to the reader, or be covered in a future post.
That being said, if you are knowledgeable about CodeQL inner workings, and are kind enough to be willing to explain to me why my alternative pieces of code have been inefficient, I would be very happy to hear from you5.
Plumbing
As previously presented, CodeQL is a set of tools for analyzing codebases. Therefore, we need a little bit of extra work to bootstrap an environment in which we can run QL queries for solving our puzzle:
- We initialize a pack for the database to be generated well6;
- And we create an empty database (we randomly pick a language to target - which doesn’t matter for solving our logic puzzle).
codeql pack init pamplemousse/queens
codeql database create --language=javascript-typescript empty.db
And we are finally ready to run our query7 to solve the game:
$ codeql query run Queens.ql --database=empty.db
[...]
Starting evaluation of queens/Queens.ql.
Evaluation completed (299ms).
| queen_1 | queen_2 | queen_3 | queen_4 | queen_5 | queen_6 | queen_7 |
+---------+---------+---------+---------+---------+---------+---------+
| 00      | 21      | 13      | 46      | 34      | 52      | 65      |
Shutting down query evaluator.
Under half a second, we get our answer.
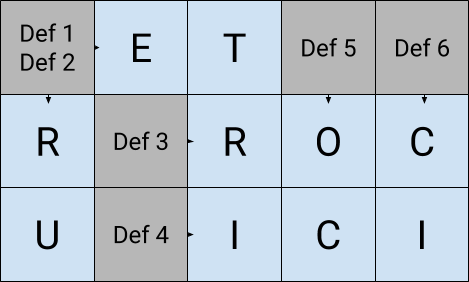
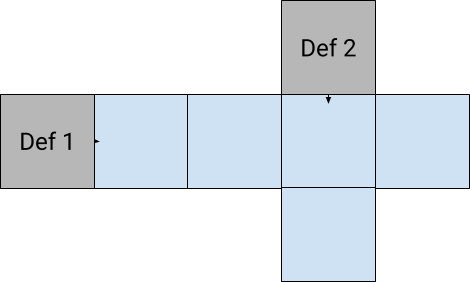
Remember, from how we declared our Cell class, each queen_i then represents a pair of coordinates: first digit is the row number, and second is the column number.
Placing the queens on the board according to the values CodeQL returned will give us:
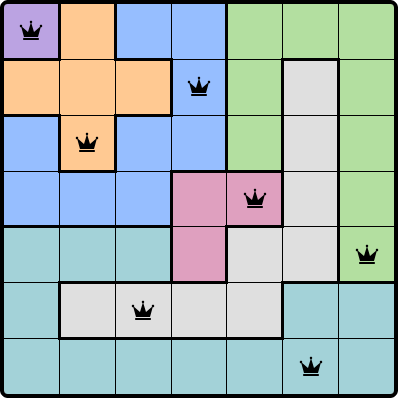
Et voilà !
All sources shared in this post are available on SourceHut, in the git.sr.ht/~pamplemousse/Queens repository.
Conclusion
The idea of solving a puzzle using CodeQL has probably partly been inspired by the QL tutorials, which I highly recommend if you want to practice your query writing skills.
This motivated me to look into more details about how logic programming languages are actually implemented. Maybe investigating the performance questions would be a great mean to learn more about how the CodeQL engine is implemented… someday.
Thanks for following this epic match, where we threw two almost unrelated things at each other, and took pleasure in it.
-
“QL” stands for Query Language. CodeQL often casually refers to any, or multiple, part(s) of the whole shebang, but documentation uses “QL” to lift the ambiguity and talk about the programming language the queries are written in. ↩
-
c.f. https://codeql.github.com/docs/ql-language-reference/about-the-ql-language/#properties-of-ql . ↩
-
c.f. https://datalog.dev/article/Introduction_to_Datalog_programming_language.html ↩
-
c.f. https://codeql.github.com/docs/writing-codeql-queries/troubleshooting-query-performance/ ↩
-
Without a
qlpack.yaml, CodeQL is able to create a database, but that one seems then to be lacking folders to be able to run our query later. ↩ -
I ran the query on a Dell XPS 15 9560, with an Intel Core i7-7700HQ CPU (quad cores, 2.80GHz base frequency), and 32GB of RAM, running on NixOS 24.05. ↩